
Deploy Astro + Sanity website to Vercel
Published At: 29/09/2023
In the following tutorial we'll deploy a basic Astro blog with Sanity as it's CMS to Vercel.
Prerequisite:
- Basic knowledge of the Terminal and Bash commands
- Git installed on your local machine
- NodeJS v18.14.1 or higher installed
- Text editor (VS Code is recommended)
Steps:
- Create the folder structure
- Initialize an Astro project
- Initialize a Sanity project
- Create an example post with Sanity
- Connect Sanity to the Astro project
- Create a minimal page to display the all the posts
- Connect the Astro website to a Github Repository
- Deploy the Astro website to Vercel
- Connect the Sanity CMS to Vercel using Web-hooks
1. Create the folder structure:
Open your terminal of choice and navigate to the folder where you want the project to be located. Run the following commands at that location:
    mkdir astro-sanity-tutorial
cd astro-sanity-tutorial
mkdir frontend
mkdir cms
After running the commands above we should have the following folder structure:
    PATH/TO/YOUR/FOLDER/astro-sanity-tutorial
├── studio
├── frontend
2. Initialize an Astro project:
To initialize an Astro project run:
npm create astro@latest
When you initialize a new Astro project you'll be prompted with a few questions in order to create an initial configurations for you project.
The following answers are recommended for most users :
    $ Where should we create your new project? ./frontend
$ How would you like to start your new project? Empty
$ Install dependencies? Yes
$ Do you plan to write TypeScript? Yes
$ How strict should TypeScript be? Strict
$ Initialize a new git repository?Yes
Now inside the frontend folder you'll have an empty Astro starting project.
3. Initialize a Sanity.io project:
Now it's time to initialize our Sanity project and get our studio up and running.
Run the following command to initialize a new Sanity project:
npm create sanity@latest
Like with the Astro installation, you'll be prompted with a few questions to determine the initial configurations of your Sanity project.
In this tutorial we'll use the Sanity blog schema.
The recommended answers:
    $ Select project to use Create new project
$ Your project name: astro-sanity-tutorial
$ Use the default dataset configuration? Yes
$ Project output path: ./cms
$ Select project template Blog (schema)
$ Do you want to use TypeScript? Yes
$ Package manager to use for installing dependencies? npm
Now we have our Sanity project setup in the cms folder along with the Astro project setup in the frontend folder and it's time to connect the two projects to work together.
4. Create an example post with Sanity:
First of all we'll create an example post to display on our new blog.
Run the following command to open your Sanity studio:
    cd cms
npm run dev
Now the Sanity studio will be available on localhost:3333.
First, you'll be prompted to log in to the studio so log in with your desired provider.
After that create a new post with the title of "Hello World" and generate a slug by pressing the Generate button next to the slug input field.
Lastly, press the green Publish button at the bottom right corner of the screen.
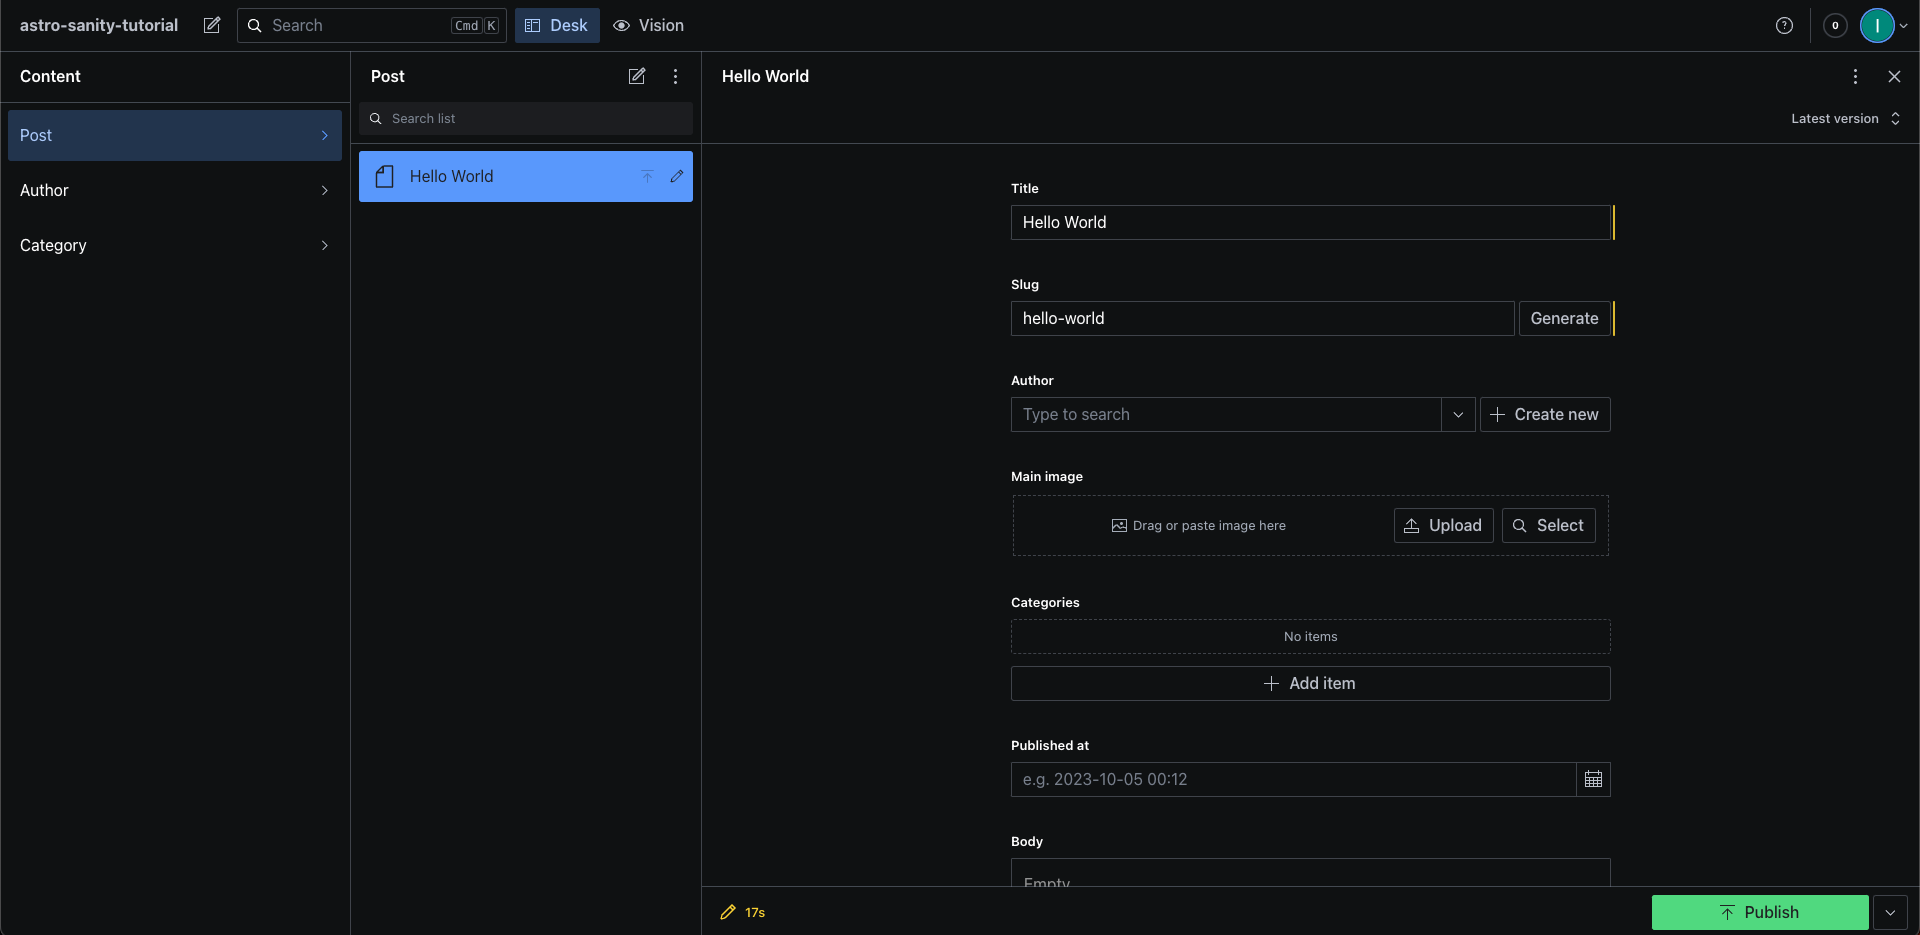
Now we have our first blog post example published and we are ready to display it on our website.
5. Connect the Astro project to Sanity:
Navigate to the frontend folder where the Astro project is located and run:
npx astro add @sanity/astro @astrojs/react
Open your Astro project on your code editor of choice, open the env.d.ts file located in the src folder and add the following lines:
    /// <reference types="astro/client" />
/// <reference types="@sanity/astro/module" />
After you add the lines above you should restart your TS server in order to resolve the changes.
Now open the astro.config.mjs file and add the following code:
    import { defineConfig } from "astro/config";
import { sanityIntegration } from "@sanity/astro";
import react from "@astrojs/react";

// https://astro.build/config
export default defineConfig({
 integrations: [
  sanityIntegration({
   projectId: "<YOUR_PROJECT'S_ID>",
   dataset: "YOUR_PROJECT'S_DATASET",
   useCdn: false,
  }),
  react(),
 ],
});
The project's id and dataset name reside in the Sanity project inside the sanity.config.ts file.
And just like that, we connected the Astro project to our Sanity CMS.
6. Create a basic page to display the posts:
Inside your Astro project, navigate to the pages folder inside your src, create a new folder called posts and inside that folder create two files, one called index.astro which will be used to display all the posts and one called [slug].astro which will be used to display a chosen post dynamically.
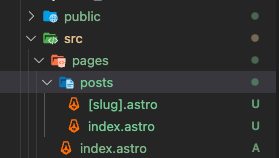
Now in the index.astro file we'll fetch all the posts from Sanity and display them as a list in our app like so:
    ---
import { sanityClient } from "sanity:client";

const posts = await sanityClient.fetch(`*[_type == "post"]`);
---

<ul>
 {
  posts.map((post: any) => (
   <li>
    <a href={"/posts/" + post.slug.current}>{post.title}</a>
   </li>
  ))
 }
</ul>
Now if we run our Astro project and navigate to http://localhost:4321/posts/ we should see a list of our posts:

Let's display a single post using our [slug].astro file. copy the following code to your [slug].astro file in order to fetch the posts, declare a dynamic url based on the slug property of your post and display the post content, which in this case it's just the title:
    ---
import { sanityClient } from "sanity:client";

export async function getStaticPaths() {
 const posts = await sanityClient.fetch(`*[_type == "post"]`);

 return posts.map(({ slug, title }) => {
  return {
   params: { slug: slug.current },
   props: { title },
  };
 });
}

const { slug } = Astro.params;
const { title } = Astro.props;
---

<h1>{title}</h1>
Great! now we can either click on the link we created in http://localhost:4321/posts/ or navigate manually to http://localhost:4321/posts/hello-world and we should see the following:

7. Connect the Astro website to a Github Repository:
It's time to deploy our newly created website.
The first step will be to upload our code and manage it in an online source control platform. For this tutorial we'll use Github.
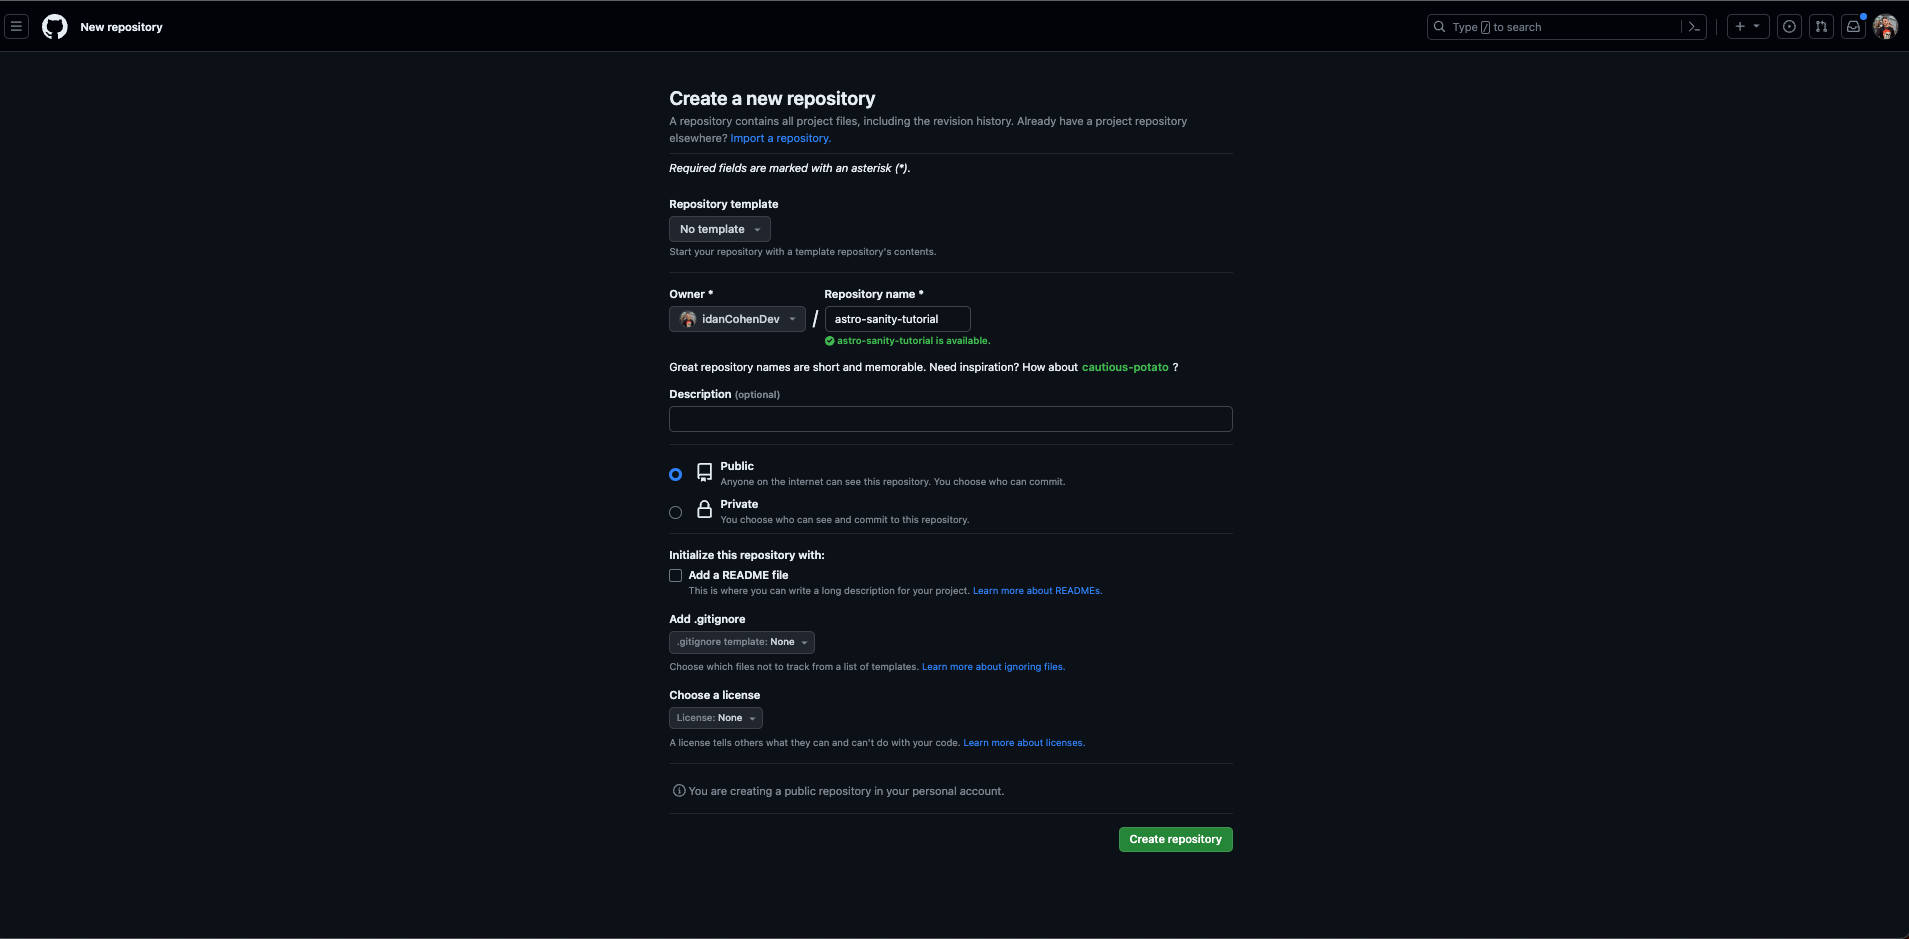
Log in or sign up for a Github account and in the main page click on the New button to create a new repository:

Give your repository a name and configure it as you like.
After that press the Create Repository button:
In your terminal navigate to the root of your Astro project an run the following commands:
    git remote add origin https://github.com/YOUR_GITHUB_USERNAME/THE_NAME_OF_YOUR_REPOSITORY.git
git branch -M master
git add .
git commit -m "initial"
git push -u origin master
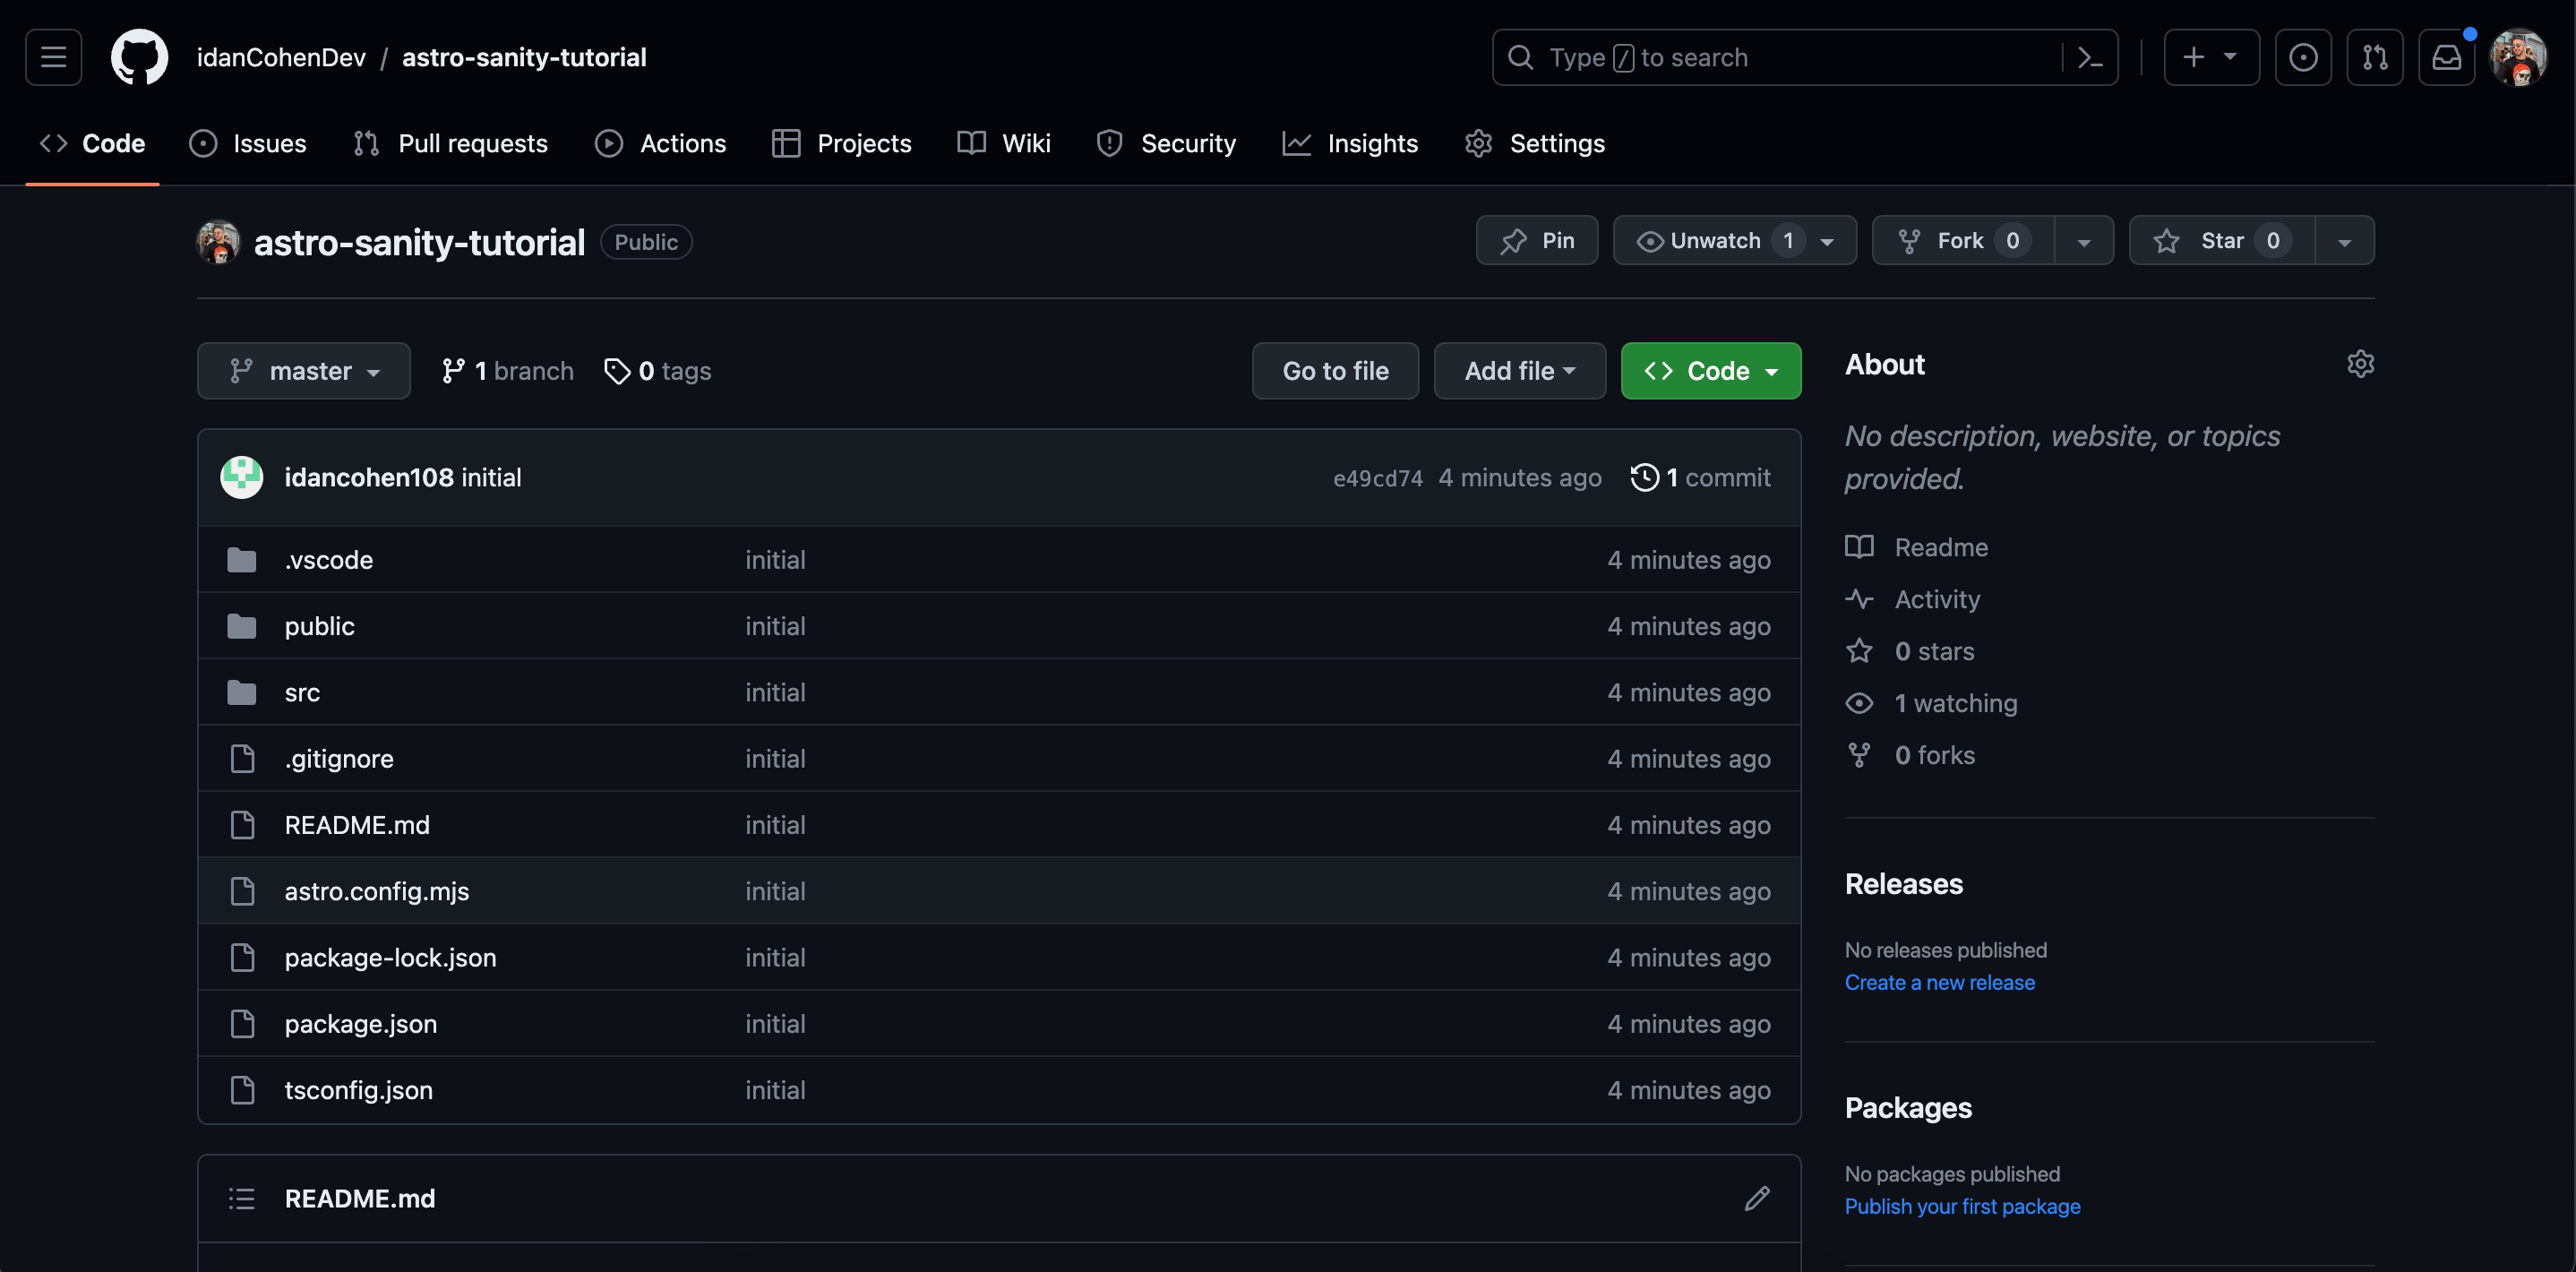
Refresh the repository page on Github and you should see the code of your Astro website:
8. Deploy the Astro website to Vercel:
Deploying a website to Vercel is really straightforward.
Log in or sign up to Vercel using your Github account and navigate to you dashboard.
Inside the dashboard press on the white Add New... button and select Project:
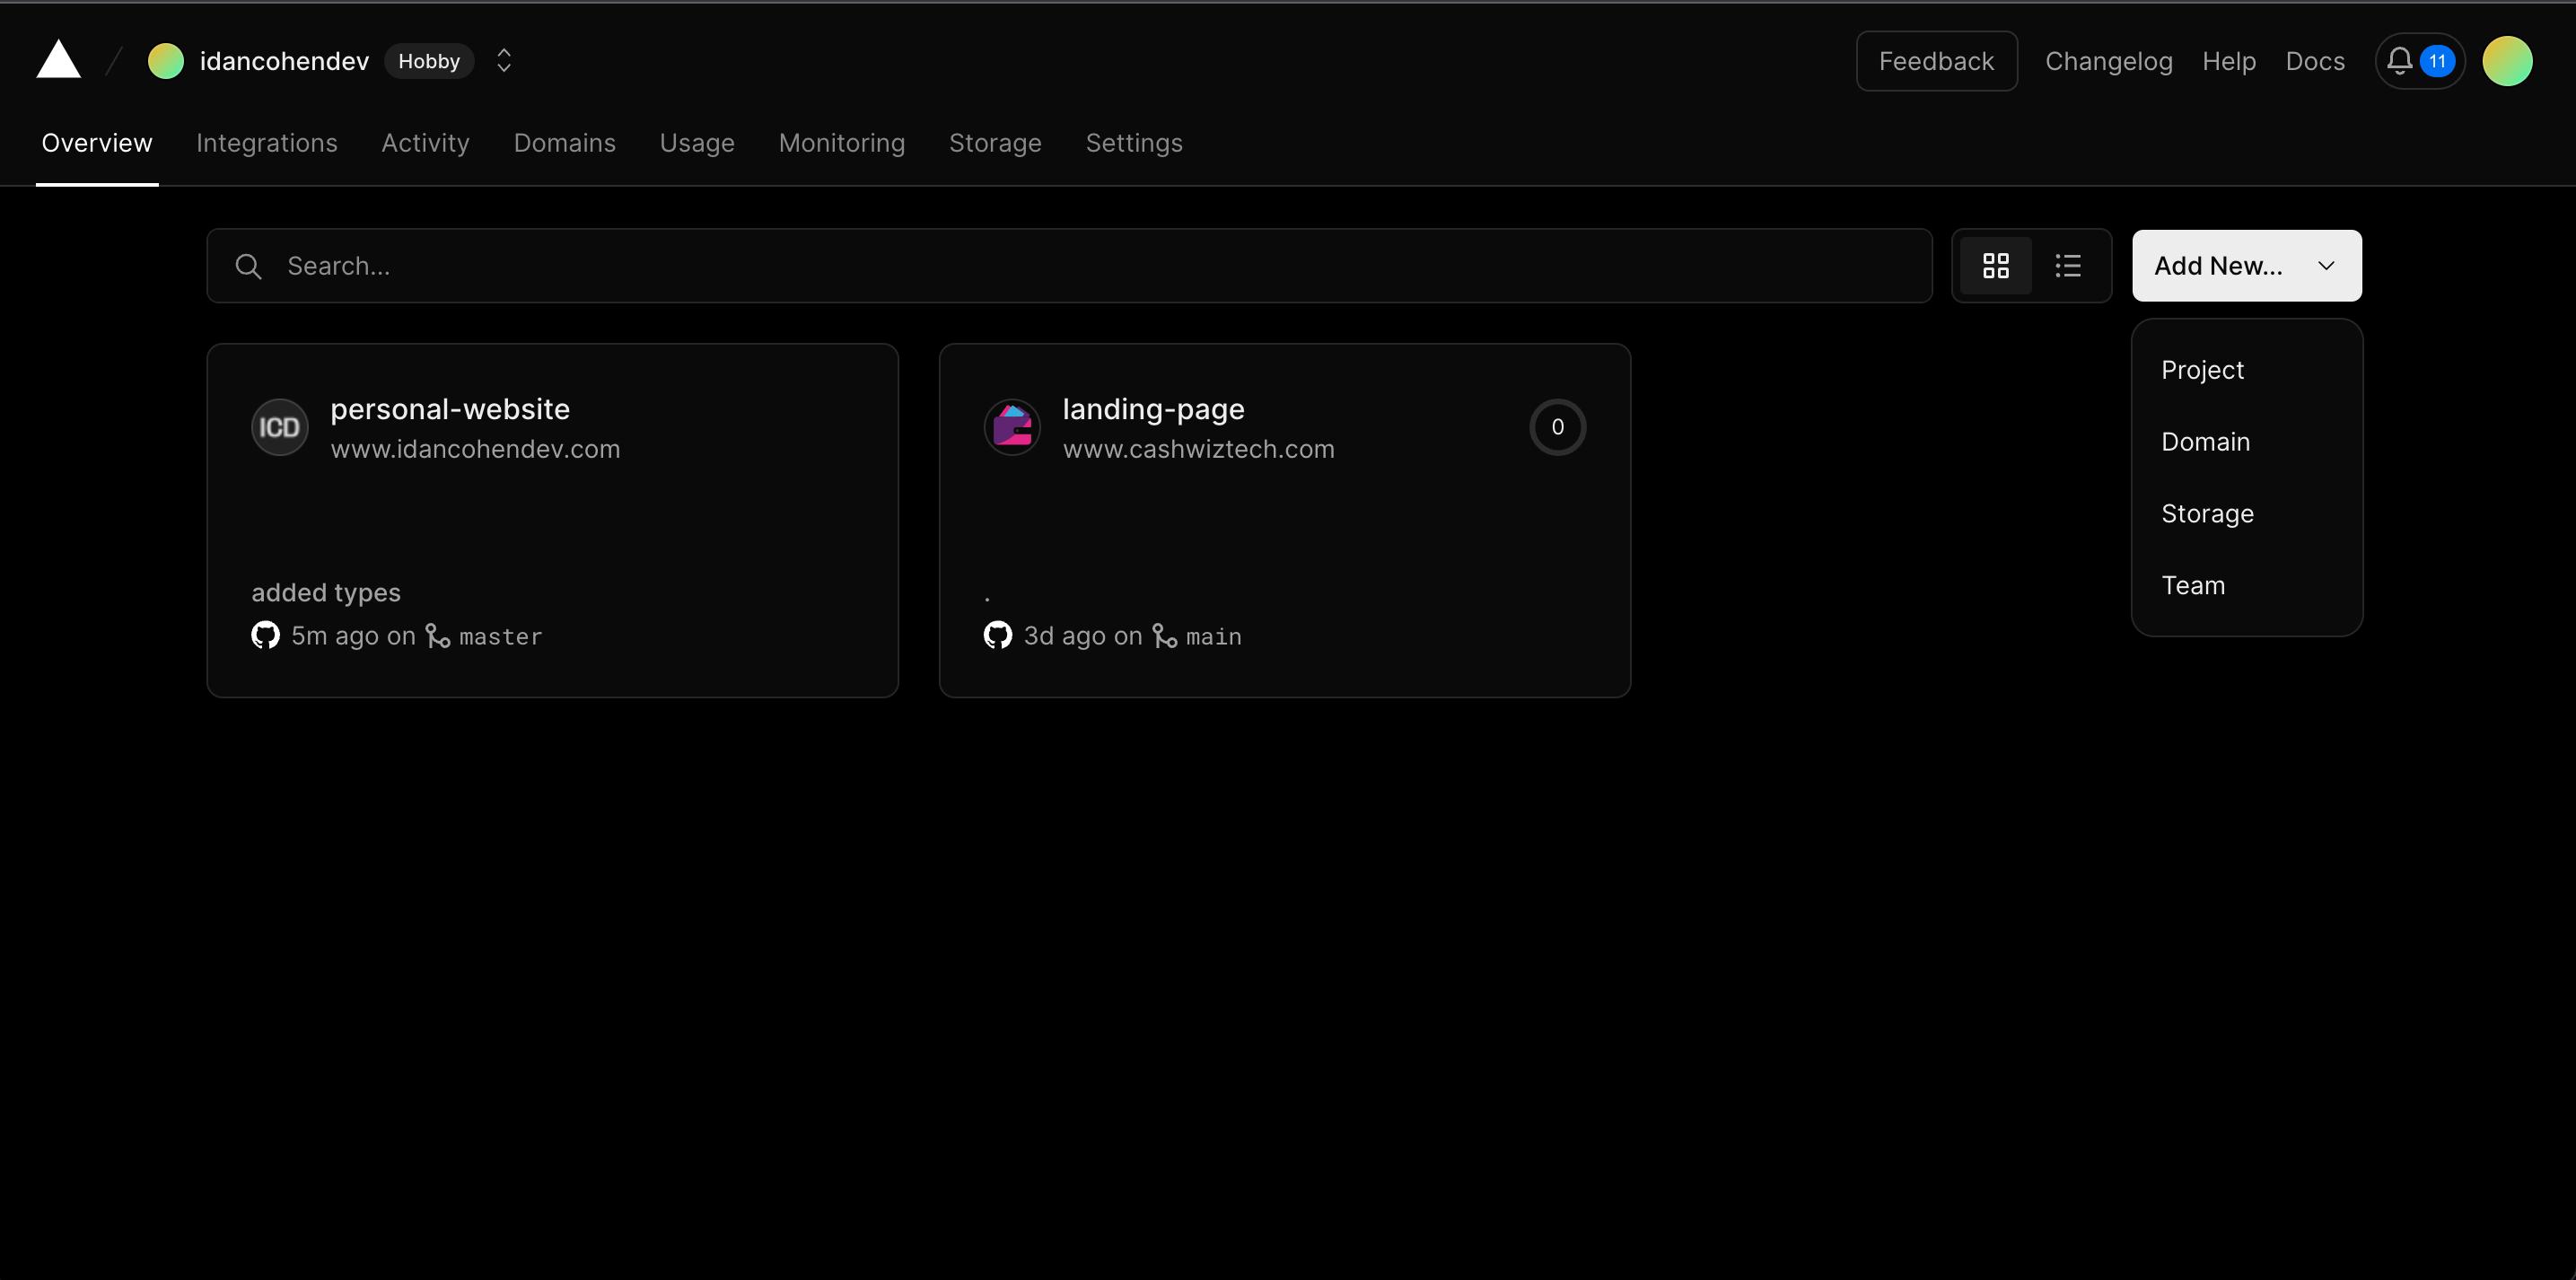
Now click on the white import button next to your project's Github repository:

Now make sure the Framework Preset is set to Astro and click on white Deploy button:
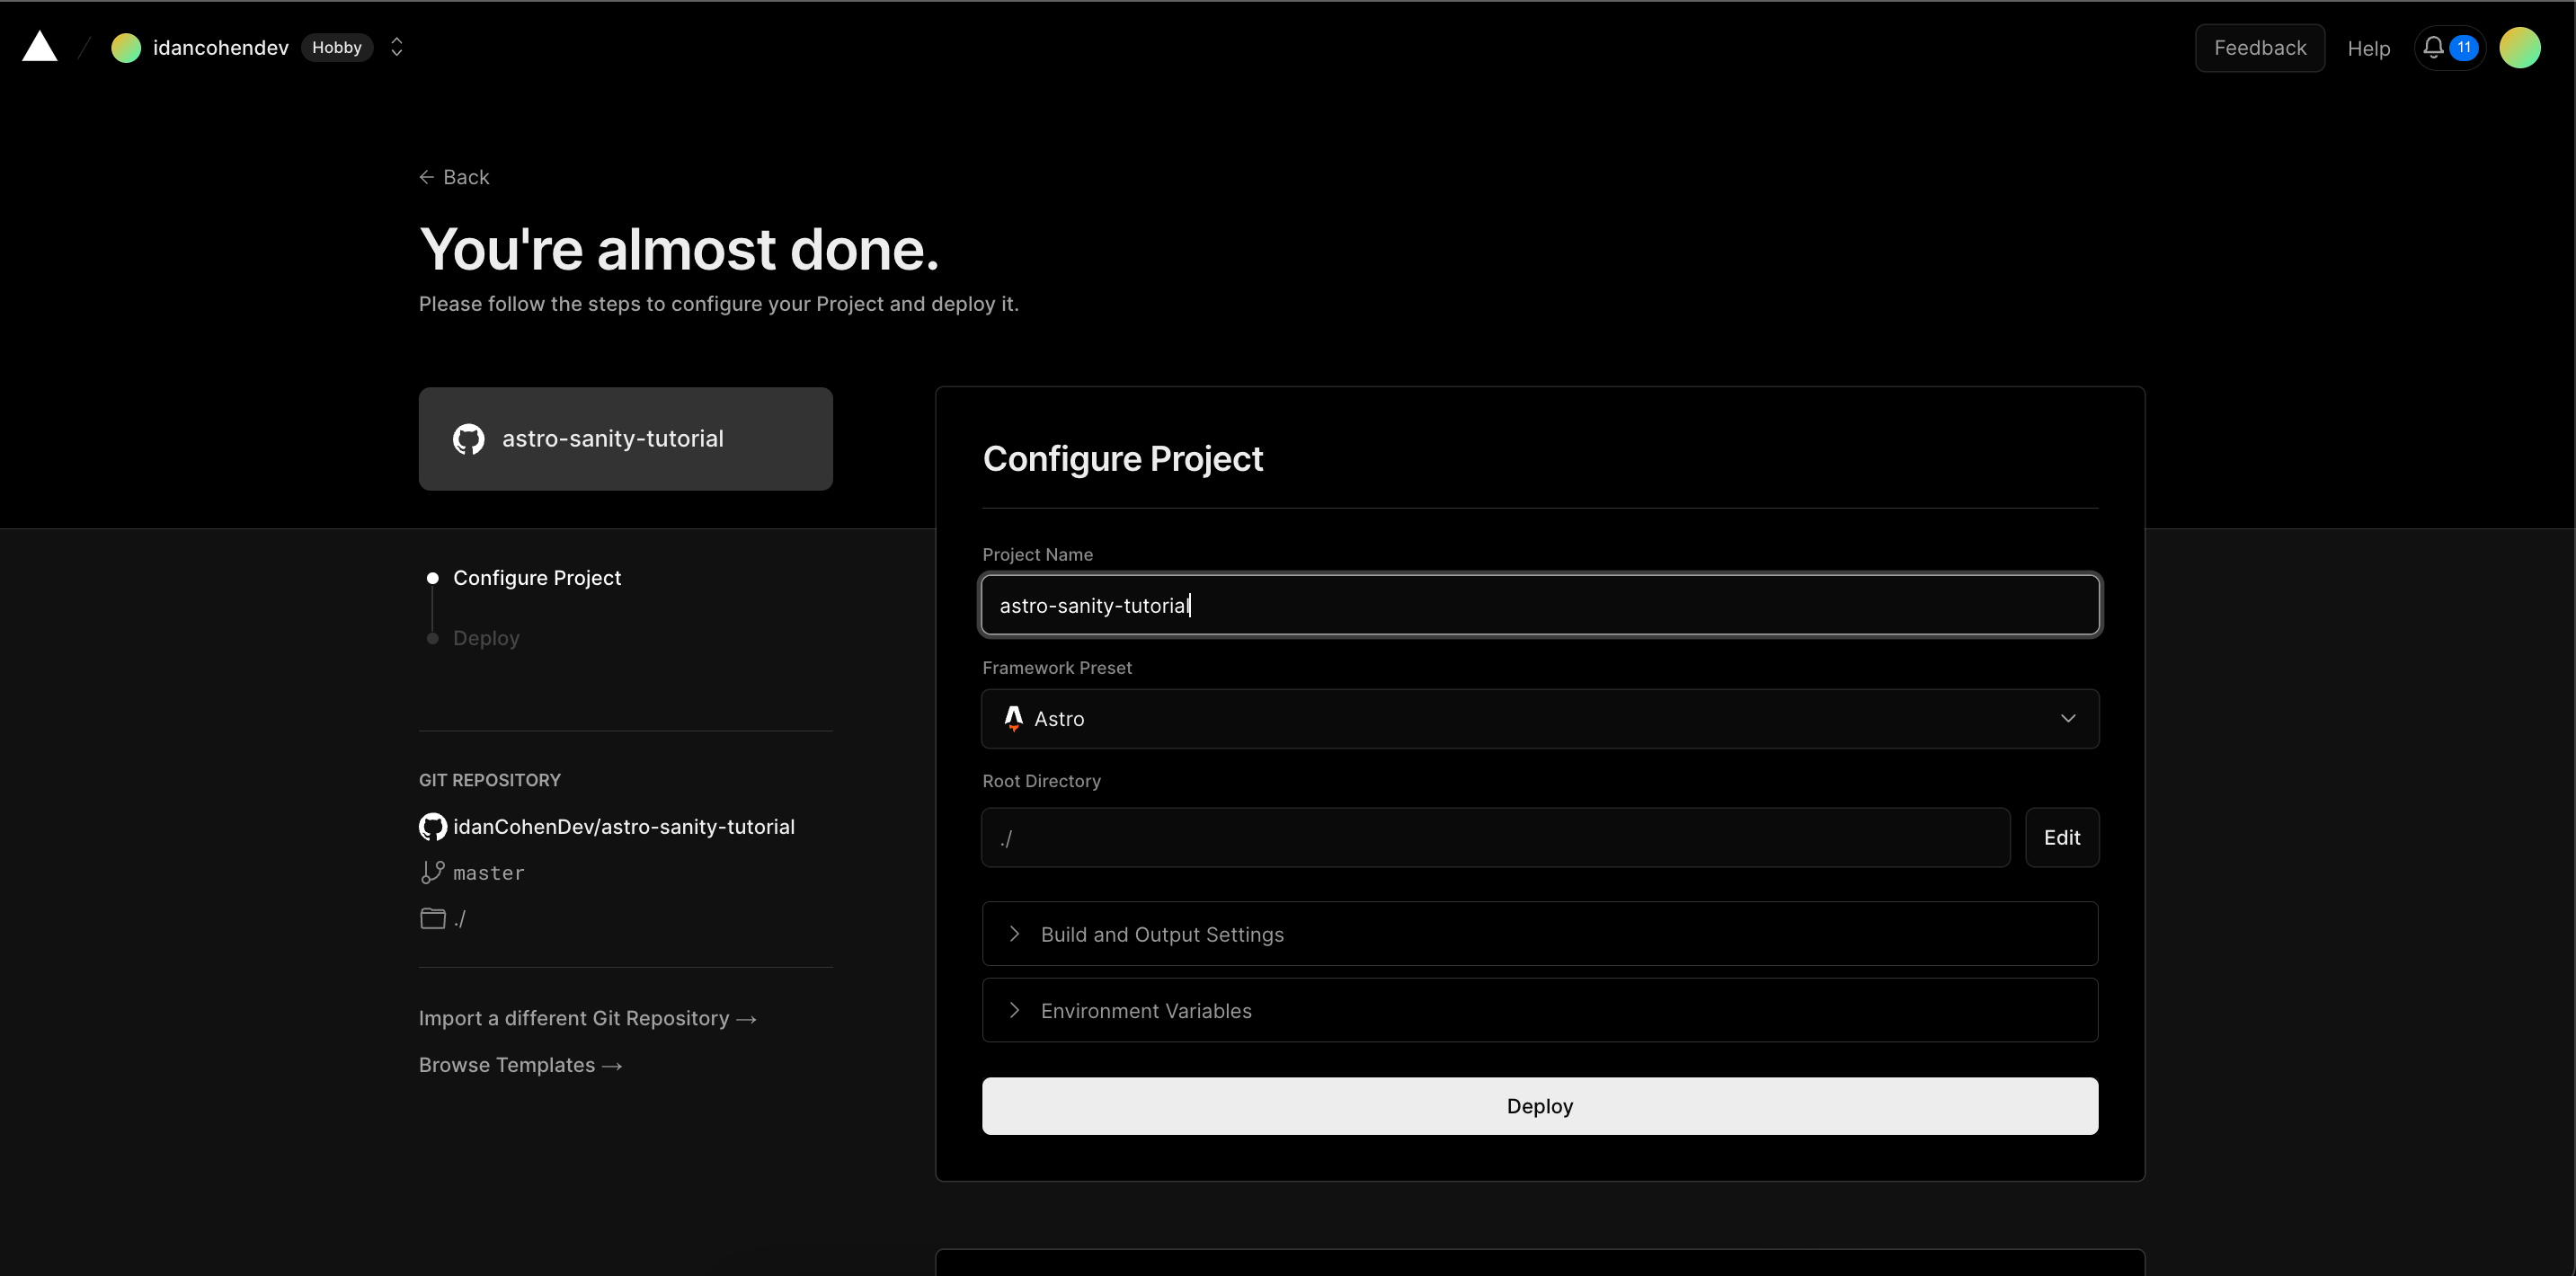
It should take up to a minute for Vercel the build and deploy your website.
When Vercel finishes building and deploying your website it'll automatically redirect you to a deployment success screen where you can press the website preview image and navigate to your newly deployed website:
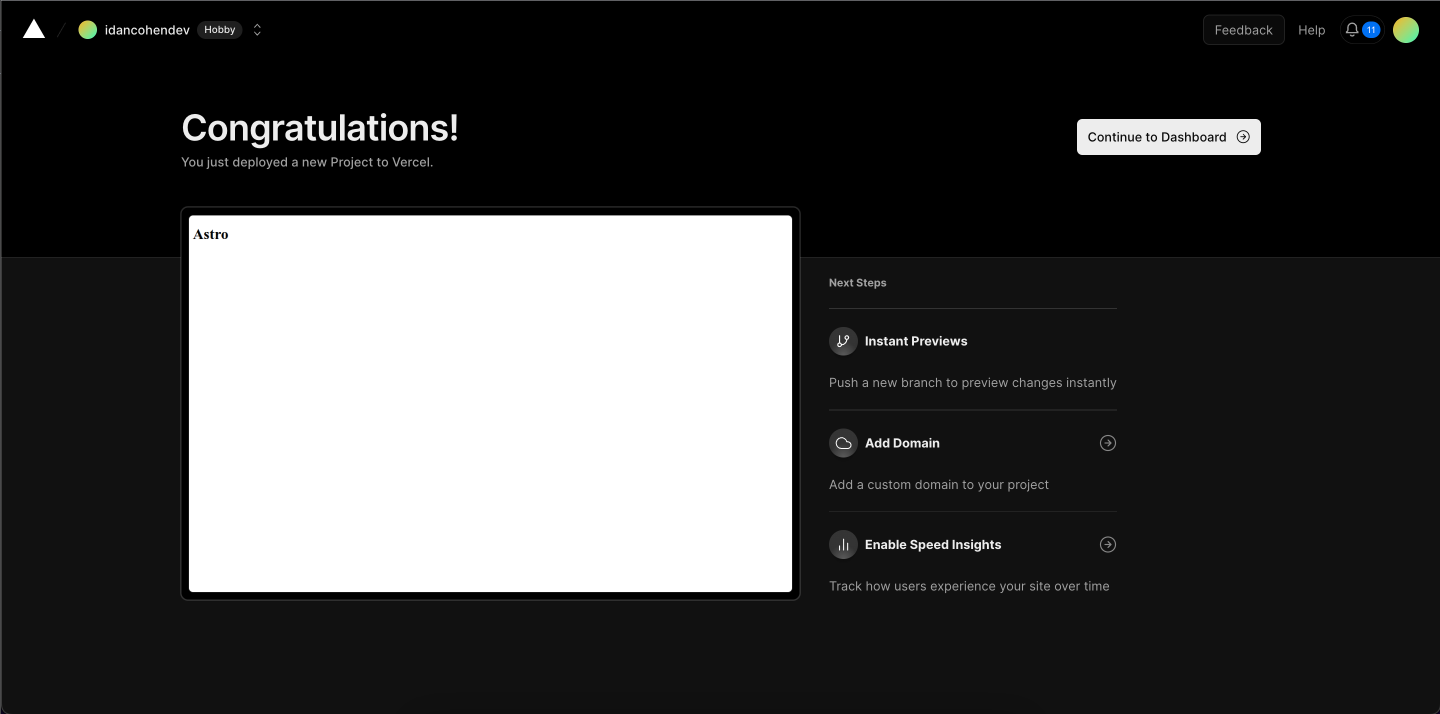
Amazing! we have a website deployed and managed by Github and Vercel, now we need to connect Sanity to Vercel.
9. Connect Sanity to Vercel using Web-hooks:
The problem now is that when we publish changes in our Sanity Studio the changes do not automatically reflect in our website.
To solve it we'll use a Webhook which will detect a change to our Sanity content and redeploy our website to Vercel with the new content.
Firstly head back to your project in Vercel and click on the Settings button:

Now, click on the Git button on the side menu and scroll down to the Deploy Hooks section. Give the newly created Webhook a custom name and provide the name of the master branch of your Github repository (in our case it's the master branch):
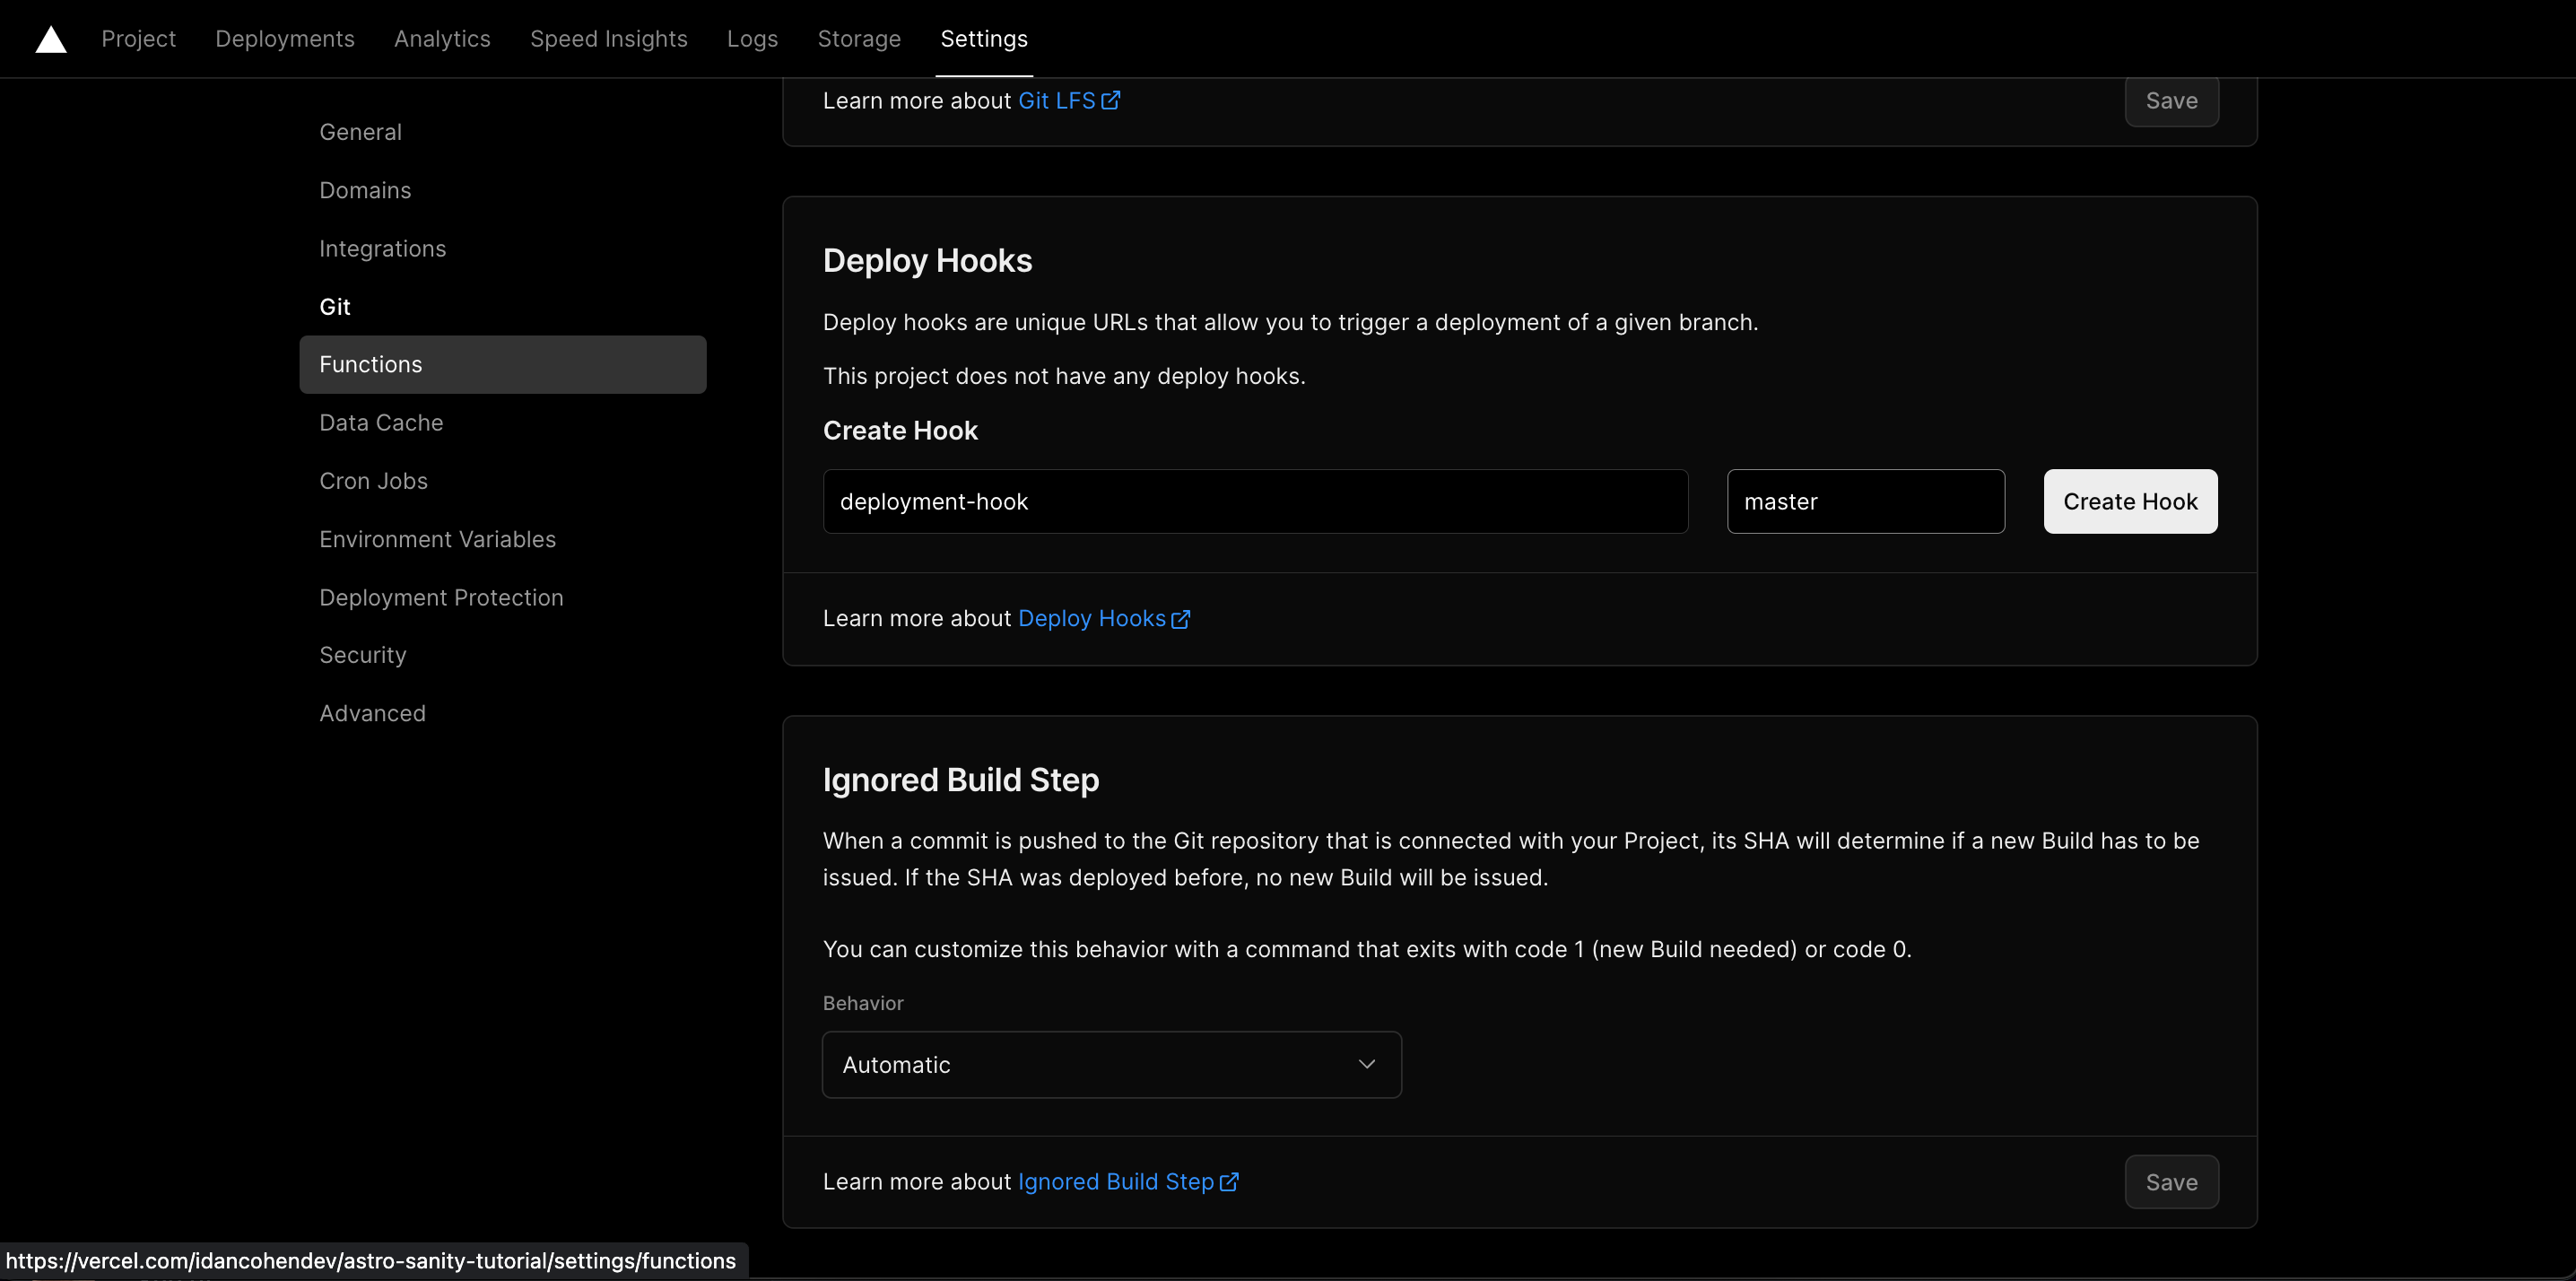
Click the Create Hook button and you'll be provided with a custom URL. Copy the provided URL and head back to the Sanity studio.
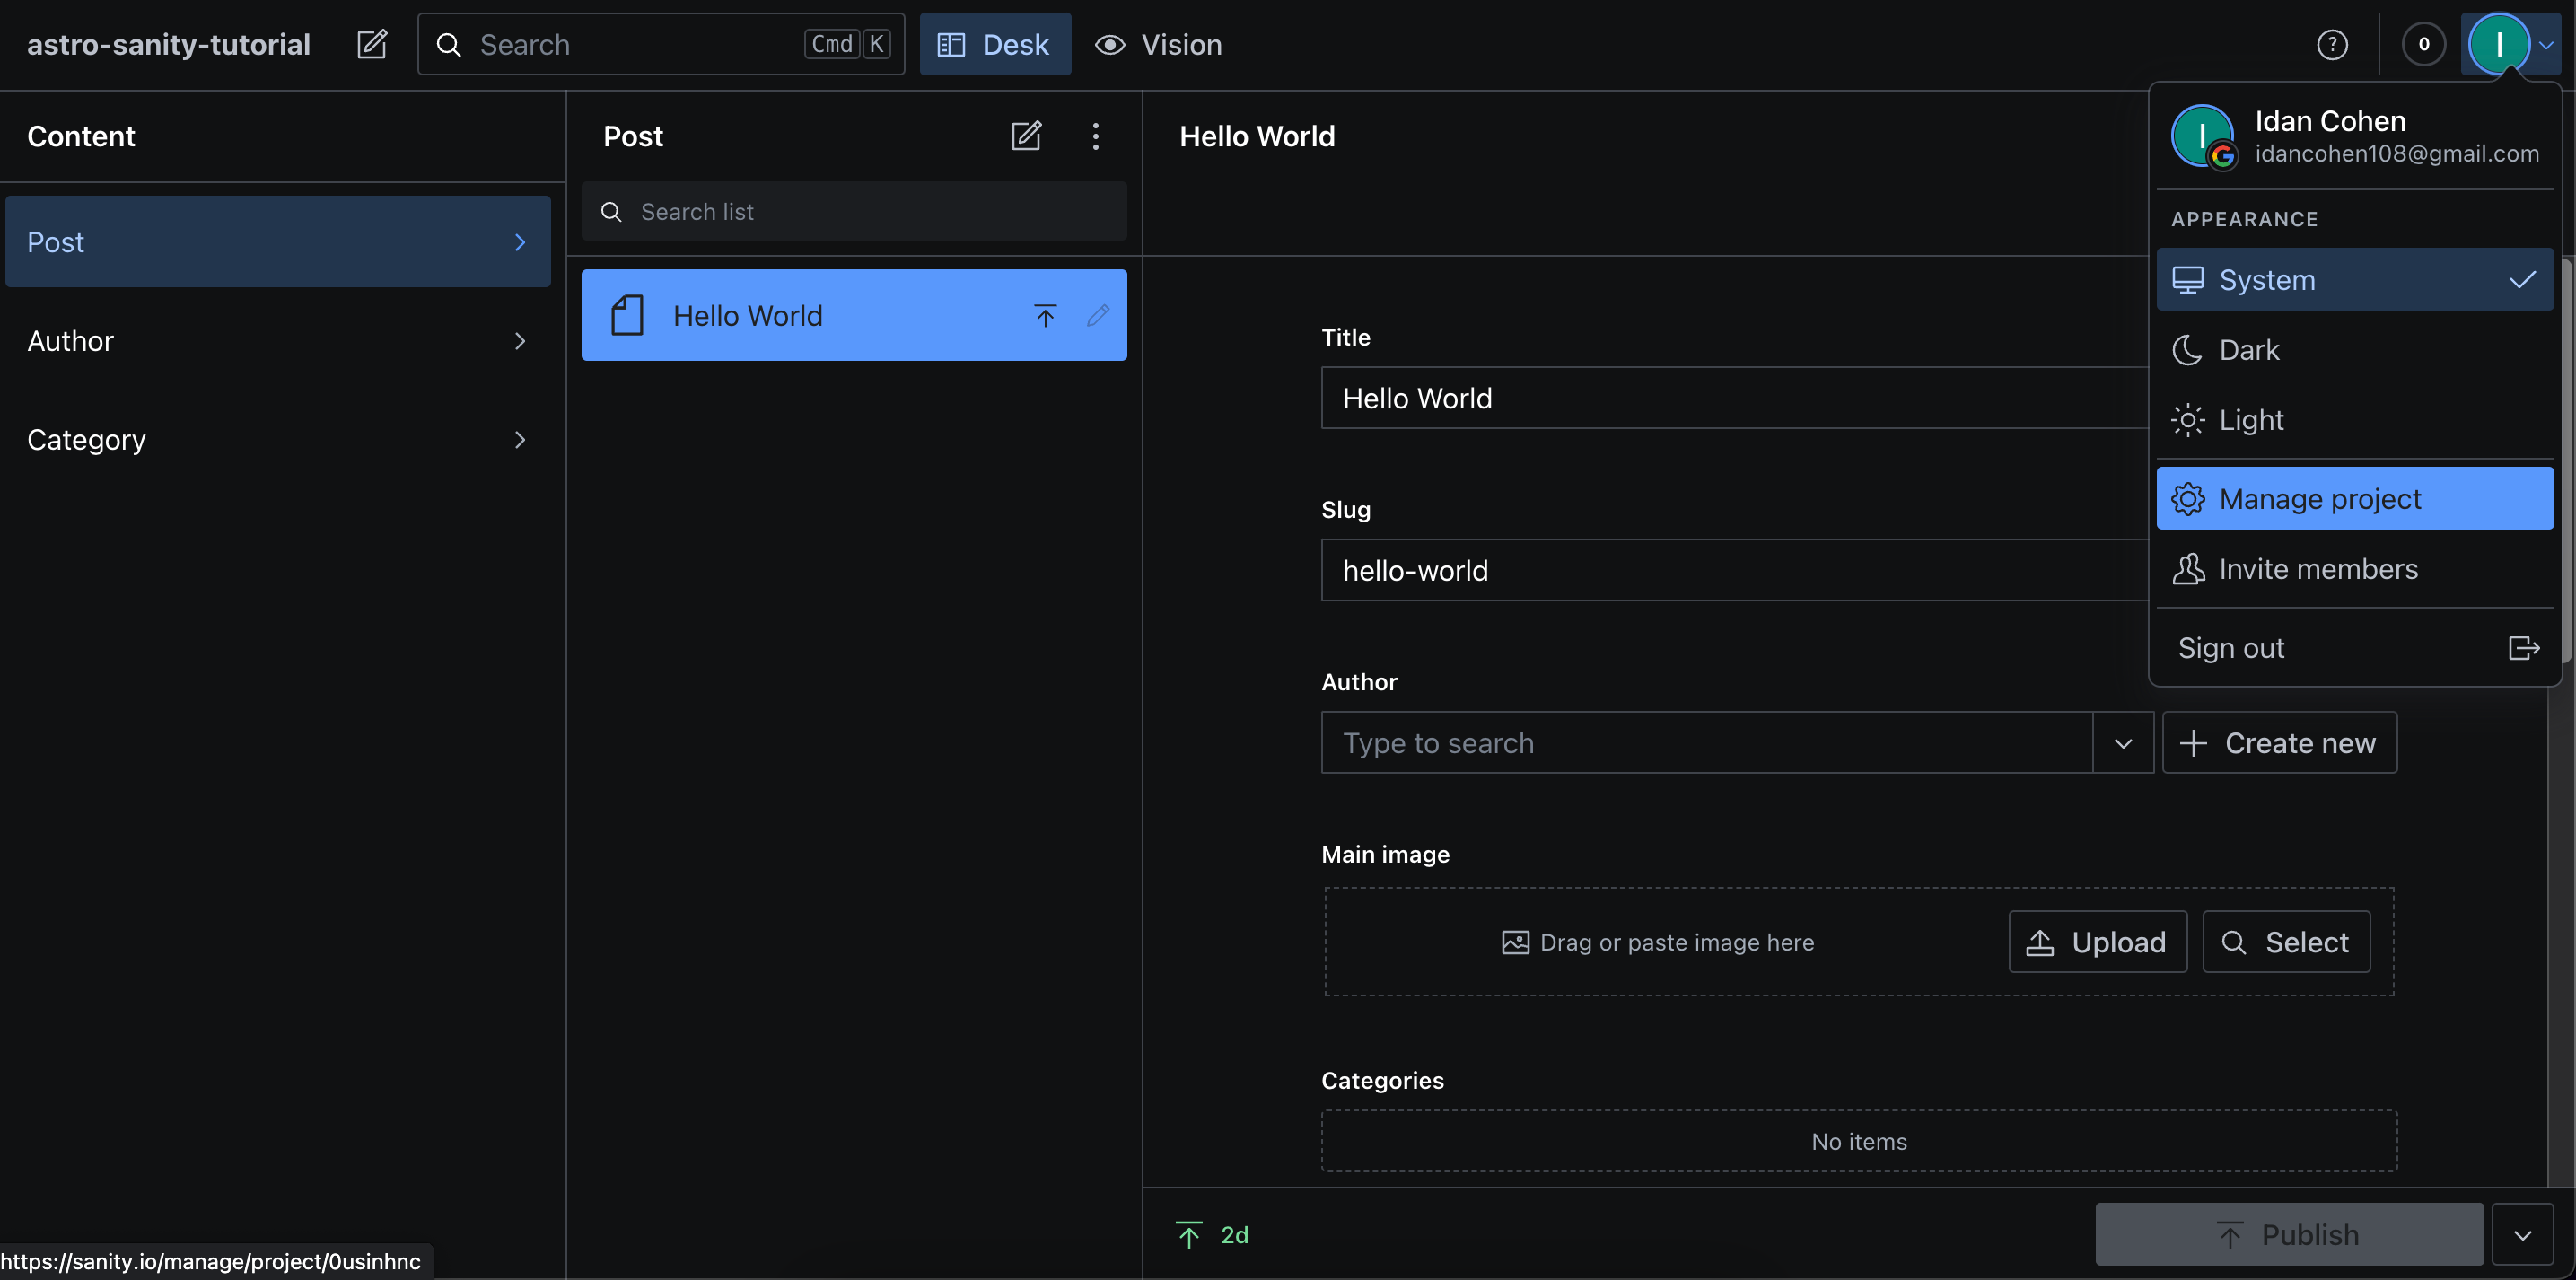
In the Sanity studio click on your profile in the top right corner and click on the Manage project button:
You'll be redirected to your project on the the Sanity.io website. Click the API button in the navigation bar and after that click on the + Create webhook button:
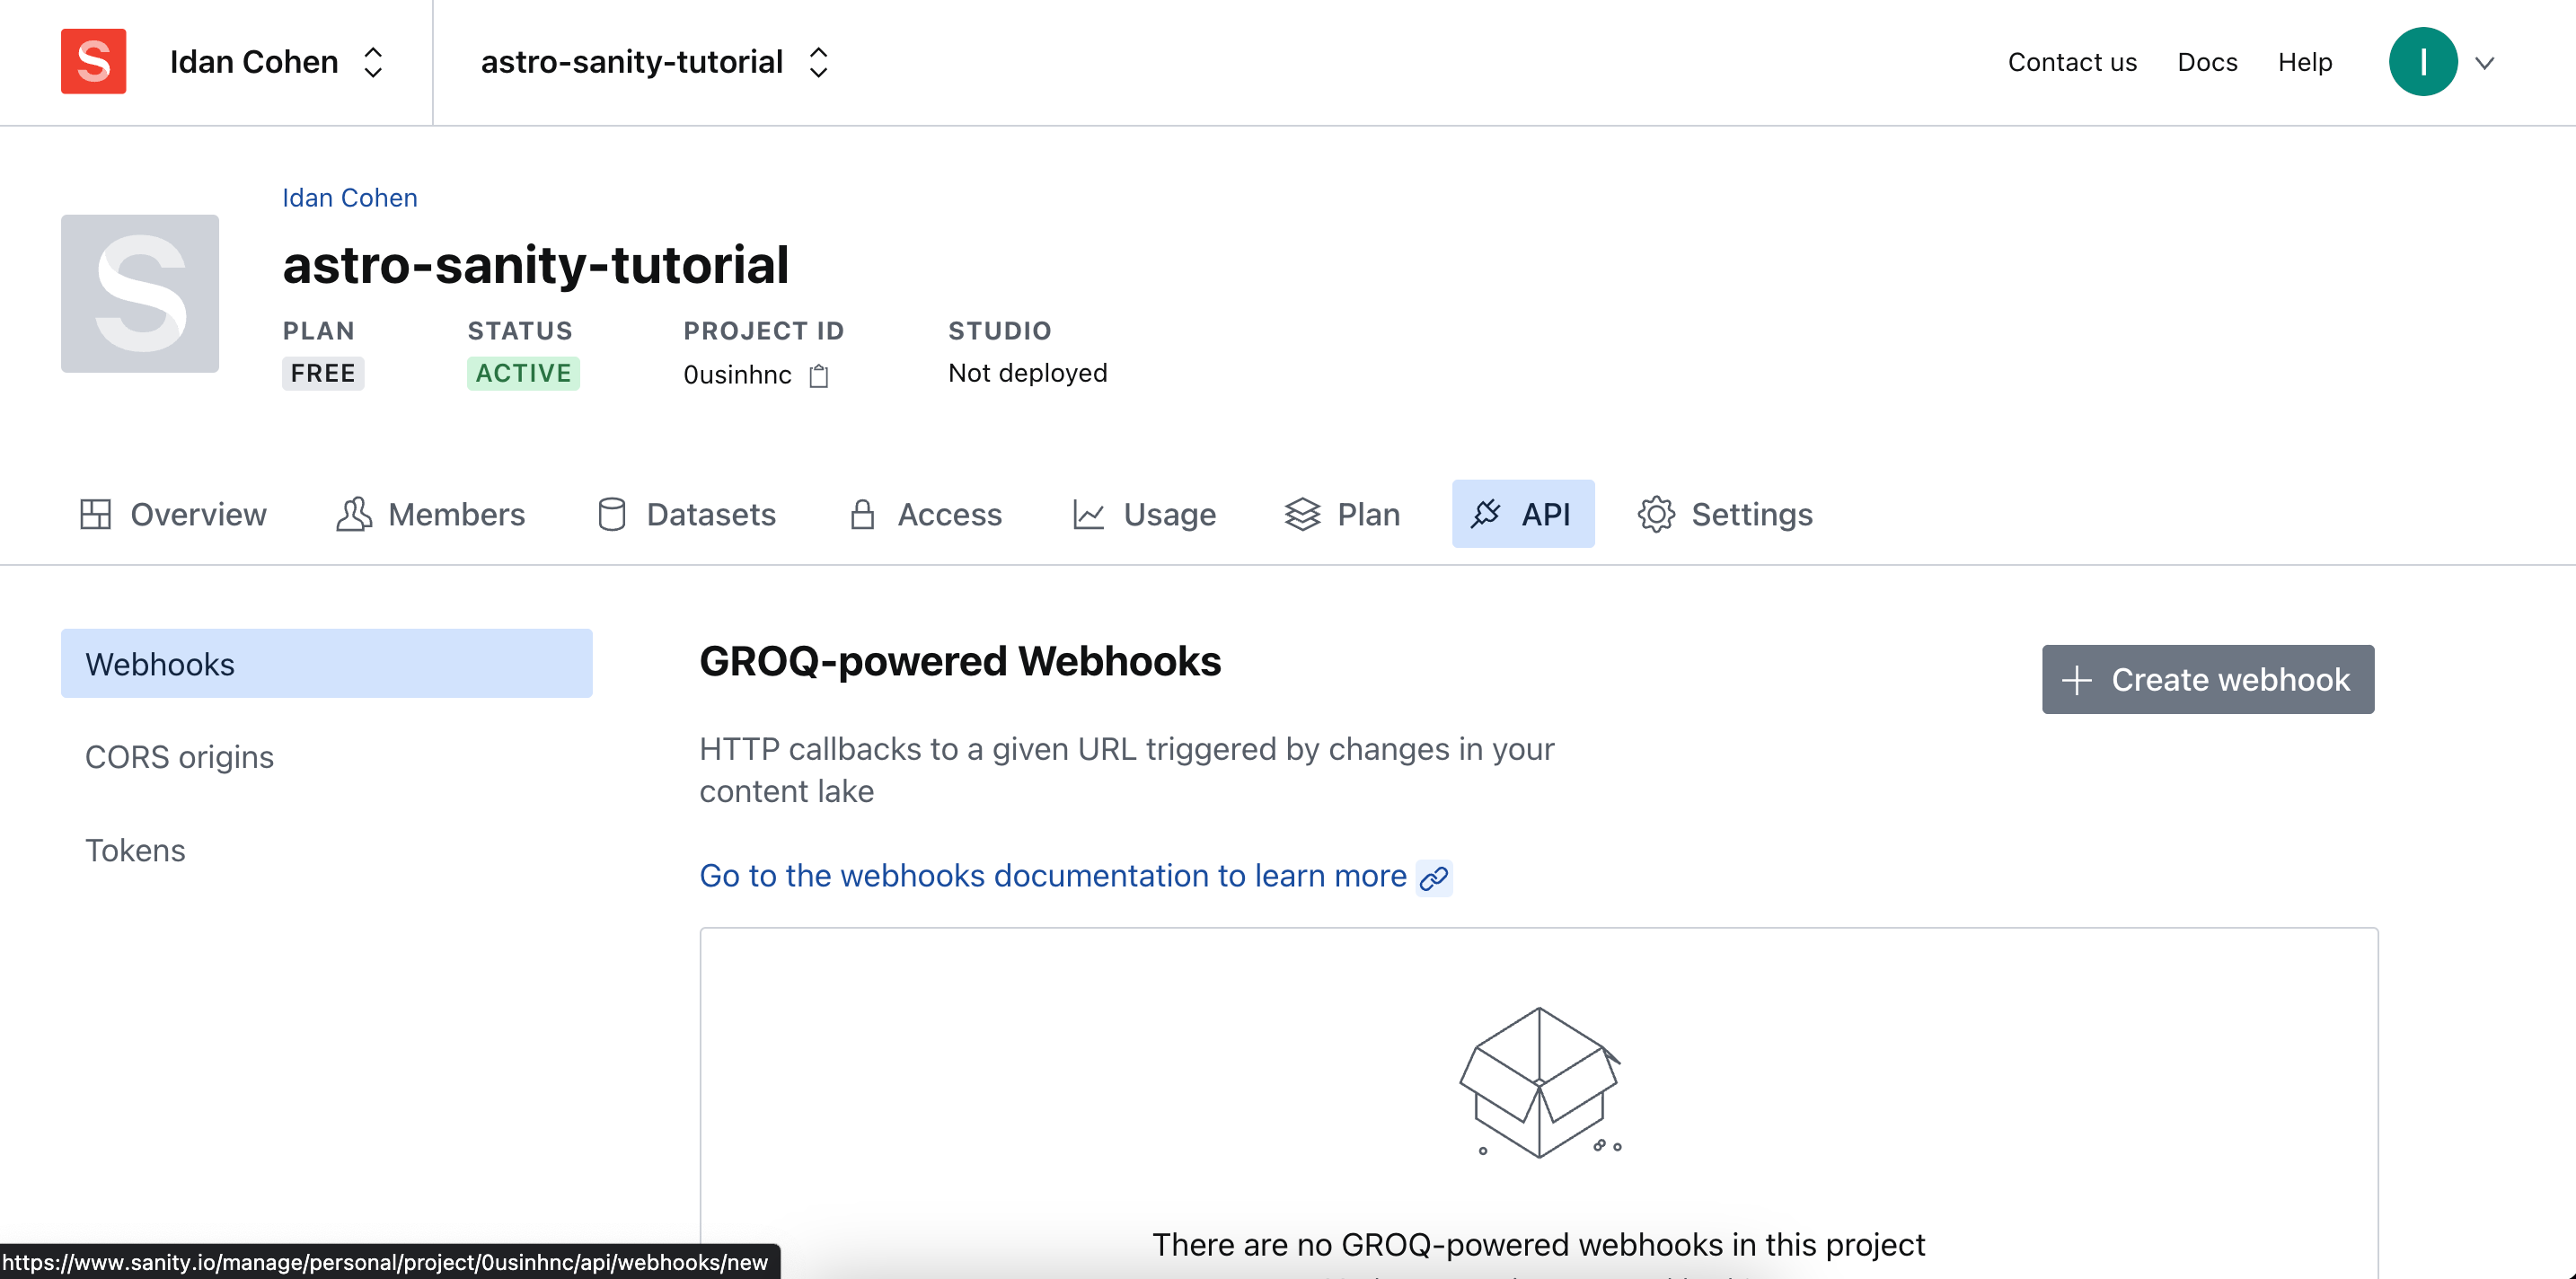
Feel free to configure the webhook however you like but keep the HTTP method as POST and in the URL field paste the URL that you copied from Vercel and click on the Save button.
Great! now every change we make to the content lake in our Sanity studio will be deployed and displayed on the website.
Found any errors? something's not clear? let me know!
Contact me on Linkedin, Github or email me.